Getting started with Aircada Studio
Create & embed 3D content
Create and embed your first 3D scene in less than 5 minutes.
This guide walks you through creating a basic 3D scene in Aircada Studio, from project creation to live embed. You'll build a simple scene with a textured cube, set up a camera orbit, and publish it for use on any site.
Step 1: Create a new project
Go to your Aircada dashboard and click “Create New Project.” This opens the Studio.
Step 2: Add a basic object
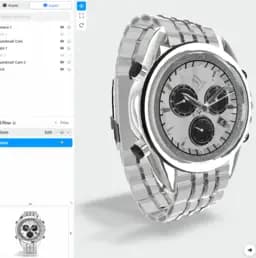
On the left, you’ll see your asset panel. Click the Cube to add it to your scene. This will serve as the object we’ll apply materials and camera behavior to.
Step 3: Apply a texture
With the cube selected, go to the right panel and open the “Material” tab. Click “Add Texture.” Choose any image from your asset library or upload a new one. You’ll see it appear on the cube’s surface immediately.
Step 4: Position the camera
You’ll see a small camera icon in your scene. That’s your active camera. Move it closer to your object so users have a better view.
Step 5: Set camera behavior
Right now, the camera is static. Let’s change that. In the left panel, click the camera object. Then in the right panel:
- Under Position Type, choose “Orbit.”
- Under Rotation Behavior, choose “Look At.”
This setup lets users click and drag to rotate around the object while the camera stays pointed at the center.
Step 6: Add environment lighting
Environment maps add realistic reflections and lighting effects. Still in the Material tab for your object, find the “Environment Map” setting. Click to upload or select an image. Then adjust the strength to get the right level of reflectivity.
You’ll notice subtle highlights and reflections appear on the object. This helps ground it in a virtual environment and gives a more polished look.
Step 7: Publish your project
Once everything looks good, click “Publish” at the top of the editor. This will generate a live embed code you can place on any site - WordPress, Webflow, React, Shopify, or anything else.
<air-viewer smart-id="..." /> tag along with a single script import.Step 8: Add your embed to a website
Paste the code into your site where you want the 3D scene to appear. That’s it. You now have a live, interactive 3D experience built in under a minute.
Final result
The scene should feel smooth, responsive, and lightweight. With basic materials and simple geometry, load times stay fast. As you get more advanced, you can replace the cube with real product models and build from there.
Need help?
Reach out through the Aircada support tab or join our Discord to get feedback and troubleshooting tips.